![[Updated] 2024 Approved Crafting Clicks Top Tags for Gamers' Content](https://thmb.techidaily.com/502b1cdc938497dc65859bd4dea7388cbc83b5388aae8627911832c708fd7626.jpg)
"[Updated] 2024 Approved Crafting Clicks Top Tags for Gamers' Content"
Crafting Clicks: Top Tags for Gamers’ Content
Hashtags are a great way to reach new viewers and subscribers interested in your content. But with so many hashtags out there, finding which ones are perfect for your YouTube gaming channel can be challenging.
That’s why we’ve extensively researched you and compiled a list of the 30 best tags/hashtags for YouTube gaming videos. We’ve also included tools to help you generate or plan your hashtags effectively to grow your channel and boost your subscription.
So, if you want to take your YouTube gaming channel to the next level, read on!
30 Best YouTube Gaming Hashtags
In recent years, YouTube has become the most popular platform for gamers worldwide. However, with millions of users uploading new videos daily, making your content stand out from the rest can take time and effort.
One way to alleviate the reach of your YouTube gaming videos is to use popular hashtags that can help you for many purposes like:
- Driving traffic toward your videos
- Increasing your brand awareness
- Expanding the search visibility of your content
You can also increase your video’s organic volume by using appropriate hashtags.
Here is the list of the 30 most popular hashtags with high search volume for YouTube gaming:
- #gamer
- #nintendo
- #games
- #livestream
- #videogames
- #gaming
- #youtubegamer
- #fortnite
- #PleaseForgiveMe
- #pcgaming
- #playfortnite
- #xbox
- #gamingcommunity
- #gamerguy
- #gamergirl
- #gamereview
- #livegaming
- #play
- #winning
- #videogameaddict
- #twitchstreamer
- #youtubegaming
- #reddead
- #playinggames
- #diablo
- #callofduty
- #xboxone
- #retrogaming
- #smallyoutuberarmy
- #nintendoswitch
Useful Tools For YouTube Gaming Hashtags
Well goes an old saying: “Better to teach someone to fish than to give him a fish.”
As a vlogger, you should use hashtags every time you upload a video to help your video spread and guide viewers to find more of your content. But it would help if you can ensure these hashtags are natural and relevant.
Hence, apart from providing the list of popular gaming hashtags, we have created this list of YouTube hashtag tools to help you generate such tags.
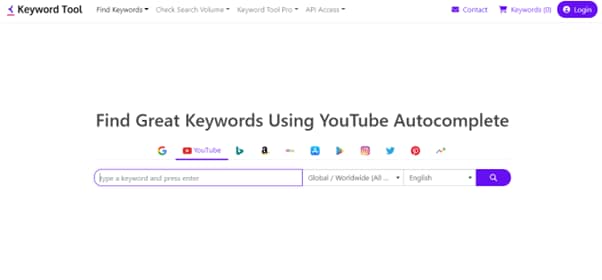
Keyword Tool
The Keyword Tool is a popular YouTube hashtags generator that can help you find popular gaming hashtags to use on YouTube. You can understand what keywords your audience is searching for with this tool.
New and popular YouTube gaming hashtags are just one click away with Keyword Tool. This tool makes developing variations, ideas, and other stuff relatively easy. It’s the best tool on the market now and gets updated regularly to provide the most relevant result each time.
The Keyword tool offers categories for each social platform and search engine where you can find the most popular tag for your videos. Hence, you can create more relevant content and reach more people on YouTube, Twitch streams, and Instagram posts. Moreover, it provides suggestions for combinations of titles. For example, it produces the fastest results and uses tolls to add the names of the games, providing you with more personalized results.
To use Keyword Tool, enter a topic into the search bar. You will then see a list of popular gaming hashtags related to your keyword. You can then use them to help promote your videos and get more views.
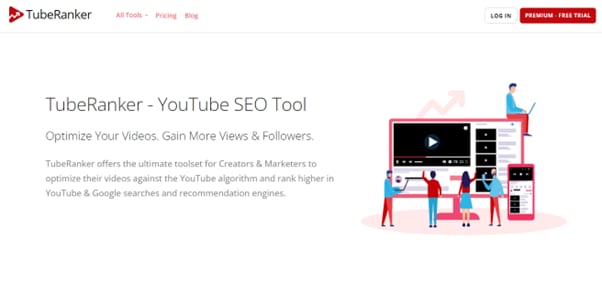
Tube Ranker
Tube Ranker is another excellent tool for ranking your videos on YouTube. This YouTube hashtag generator is fast, easy to use, and effective at getting your videos to the top of search results in no time.
Tube Ranker tool can work as a description generator, a channel auditor, a tags extractor, an SEO rank tracker, a keyword generator, and a title generator.
Therefore, if you want more views and engagement on your YouTube gaming videos, the Tube Ranker should be a must-have tool in your arsenal!
As to the price, TubeBuddy comes with a Pro version for $7.20/month, a Star version for $15.20/month, and a Legend version for $39.20/month in addition to the free version.

SEO Book
SEOBook is an excellent website for learning about search engine optimization (SEO). Aaron Wall, a leading expert on the topic, writes the book. This website covers everything from the basics of SEO to more advanced concepts.
The tool can help you generate relevant hashtags for your YouTube gaming videos and make your content more visible.

![]()
Note: If you want to optimize your YouTube gaming videos’ descriptions, tags and titles, click here to learn how!
Bonus: Using Filmora To Screen Record Or Edit The Gaming Video
Although we have talked about the most popular gaming hashtags and the useful tools for you videos, meanwhile, the quality and the content of the video are worth of high attention.
With the popularity of YouTube Gaming videos, how to record or edit content to make it more engaging and eye-capturing is important.
Therefore, we recommend using Filmora - a user-friendly video editing software for both Mac and Windows. It has all the features you need to edit, screen record, and export the edited videos to YouTube.
https://www.youtube.com/embed/
Free Download For Win 7 or later(64-bit)
Free Download For macOS 10.14 or later
There are many reasons to use Filmora, but here are the most important ones:
- Quick and easy to use, even for novice users
- It helps you screen record the footage of your game and webcam simultaneously while you are playing.
- Offers AI portrait, green screen, mask & blend, New BlueFX, and Boris FX effects
- Excellent and clear UI
- It lets you edit the video and add effects, transitions, and other elements to make it more engaging.
- It includes instant mode, PIP, preset templates for different occasions, WordArt, title editing, and motion tracking features.
- You can export the edited video to YouTube with just a few clicks.
Conclusion
This comprehensive article provides the 30 best tags/hashtags for YouTube gaming to help you improve your content visibility. We’ve also discussed the three most popular YouTube hashtags generator.
Moreover, we’ve recommended using Filmora to quickly screen record or edit your YouTube gaming videos before searching for popular hashtags.
We hope you’ve enjoyed reading this article and can now use the right hashtags for your YouTube gaming content.
The Speedy Path to Flawless YouTube Subtitling & CC Integration
How to Easily Add Subtitles and Closed Captions to YouTube Video

Richard Bennett
Mar 27, 2024• Proven solutions
In this article, we are going to show you how important it is to add subtitle and closed captions in your YouTube video, and how to add them.
The best video editor for YouTubers - Wondershare Filmora , not only allows you to cut, crop, rotate, reverse videos, but also offers your advanced features like PIP, Green Screen, or audio mixing. What’s more, you can find lots of effects for Fashion, gaming, education, tutorial, sports, etc. Check this article to know more.


Why subtitle and closed captions are important for YouTube videos?
- Forced closed captions and subtitles actually help the viewers to understand the content in your video if the audio quality of your video is bad, muffled or barely audible. Reading makes it easier for them to understand.
- This also helps people with hearing impairments. People with troubled ears can still watch and understand your content.
- It’s a great aid to such videos which have been recorded in other foreign languages that you don’t understand. Hence it will increase the number of viewers all around the world.
- They both are generally added for easy accessibility to the viewers who wish to watch in sound sensitive environments.
So, here we are going to show you two ways to add subtittles to video: directly or uploading caption or transcript files
Adding subtitles and closed captions manually
To add subtitles and closed captions to your YouTube video, fisrt, you should sign in to your YouTube account. On left right below ‘Home’ you will find ‘My Channel’. It will direct you to your personal YouTube page. On the top, right next to your subscribers lays the ‘Video manager’, giving you the list of your uploaded videos.
Select the video and click on edit to get a drop down menu. Click on subtitles and CC. This will take you to the subtitling interface. To the right of video select ‘add new subtitles’ and then ‘create new subtitles’. Select the subtitle language. Play the video to listen to the content and type down in the box. Click on ‘+’ button once you are done.
This will create a subtitle timeline right beneath the video. You can manage by dragging and expanding the subtitle duration according to the audio of the video. The subtitle will appear at the bottom of the video screen. Click ‘publish’ once done.
An interruption might occur with appearing of subtitles in accordance with video. Hence a lot precision is required while doing so.
Uploading Caption or Transcript Files automatically
To upload Caption or Transcript Files to YouTube Videos you first need to create a format on a text editor. For windows use Notepad and for Mac you may use TextEdit. Create a format of putting the number of subtitle first, time stamp and then text of the subtitle. For example
1\
00:02:34:12 using a format of (hour : minute : second : millisecond)
2. *text*
This is the sample text for first subtitle at zero hours, two minutes, thirty four seconds and twelve milliseconds. Once done with this. Go to file, select ‘save as’. Write the file name with an extension of .srt and select ‘All files’ for type of file. Click encoding menu and select UTF-8. Once saved, sign in to your YouTube account.
On left right below ‘Home’ you will find ‘My Channel’. It will direct you to your personal YouTube page. On the top, right next to your subscribers lays the ‘Video manager’, giving you the list of your uploaded videos.
Select the video and click on edit to get a drop down menu. Click on subtitles and CC. Go to ‘add subtitles’ and then ‘upload a file’. A pop-up menu will appear select ‘subtitles file’. Click upload. The file will send subtitles to your video.
This will create a subtitle timeline right beneath the video. You can manage by dragging and expanding the subtitle duration according to the audio of the video. The subtitle will appear at the bottom of the video screen. Click ‘publish’ once done.
3 Best Tools for add/managing video Subtitles/CC
1. Amara
Amara is a smart video editor which helps insert captions and subtitles to videos. It also helps in transcribing the videos. It takes help of crowd sourcing to subtitle any YouTube video. They take help from viewers to subtitle the videos. By making crowd subtitling available for any YouTube creator, they are allowing them to reach more viewers in more languages
2. DIY Captions
DIY captions help you to transcribe the YouTube videos, if not in most accurate manner, then in a little easier way. All you have to do is just paste the URL of the YouTube video and it will provide you all the subtitles. These may not be accurate but will provide you major base material which can be tweaked a bit here and there and is far better than making all the subtitles starting from scratch.
3 Subtitles for YouTube
Subtitles for YouTube is a Google Chrome extension which provides subtitles for YouTube videos. For this you will have to provide a subtitle file with .srt extension. The attractive feature of this is that you won’t have to download the video and still run the subtitles on it. This is very much helpful for people who work on YouTube or watch movies without subtitles.
Richard Bennett
Richard Bennett is a writer and a lover of all things video.
Follow @Richard Bennett
Richard Bennett
Mar 27, 2024• Proven solutions
In this article, we are going to show you how important it is to add subtitle and closed captions in your YouTube video, and how to add them.
The best video editor for YouTubers - Wondershare Filmora , not only allows you to cut, crop, rotate, reverse videos, but also offers your advanced features like PIP, Green Screen, or audio mixing. What’s more, you can find lots of effects for Fashion, gaming, education, tutorial, sports, etc. Check this article to know more.
Why subtitle and closed captions are important for YouTube videos?
- Forced closed captions and subtitles actually help the viewers to understand the content in your video if the audio quality of your video is bad, muffled or barely audible. Reading makes it easier for them to understand.
- This also helps people with hearing impairments. People with troubled ears can still watch and understand your content.
- It’s a great aid to such videos which have been recorded in other foreign languages that you don’t understand. Hence it will increase the number of viewers all around the world.
- They both are generally added for easy accessibility to the viewers who wish to watch in sound sensitive environments.
So, here we are going to show you two ways to add subtittles to video: directly or uploading caption or transcript files
Adding subtitles and closed captions manually
To add subtitles and closed captions to your YouTube video, fisrt, you should sign in to your YouTube account. On left right below ‘Home’ you will find ‘My Channel’. It will direct you to your personal YouTube page. On the top, right next to your subscribers lays the ‘Video manager’, giving you the list of your uploaded videos.
Select the video and click on edit to get a drop down menu. Click on subtitles and CC. This will take you to the subtitling interface. To the right of video select ‘add new subtitles’ and then ‘create new subtitles’. Select the subtitle language. Play the video to listen to the content and type down in the box. Click on ‘+’ button once you are done.
This will create a subtitle timeline right beneath the video. You can manage by dragging and expanding the subtitle duration according to the audio of the video. The subtitle will appear at the bottom of the video screen. Click ‘publish’ once done.
An interruption might occur with appearing of subtitles in accordance with video. Hence a lot precision is required while doing so.
Uploading Caption or Transcript Files automatically
To upload Caption or Transcript Files to YouTube Videos you first need to create a format on a text editor. For windows use Notepad and for Mac you may use TextEdit. Create a format of putting the number of subtitle first, time stamp and then text of the subtitle. For example
1\
00:02:34:12 using a format of (hour : minute : second : millisecond)
2. *text*
This is the sample text for first subtitle at zero hours, two minutes, thirty four seconds and twelve milliseconds. Once done with this. Go to file, select ‘save as’. Write the file name with an extension of .srt and select ‘All files’ for type of file. Click encoding menu and select UTF-8. Once saved, sign in to your YouTube account.
On left right below ‘Home’ you will find ‘My Channel’. It will direct you to your personal YouTube page. On the top, right next to your subscribers lays the ‘Video manager’, giving you the list of your uploaded videos.
Select the video and click on edit to get a drop down menu. Click on subtitles and CC. Go to ‘add subtitles’ and then ‘upload a file’. A pop-up menu will appear select ‘subtitles file’. Click upload. The file will send subtitles to your video.
This will create a subtitle timeline right beneath the video. You can manage by dragging and expanding the subtitle duration according to the audio of the video. The subtitle will appear at the bottom of the video screen. Click ‘publish’ once done.
3 Best Tools for add/managing video Subtitles/CC
1. Amara
Amara is a smart video editor which helps insert captions and subtitles to videos. It also helps in transcribing the videos. It takes help of crowd sourcing to subtitle any YouTube video. They take help from viewers to subtitle the videos. By making crowd subtitling available for any YouTube creator, they are allowing them to reach more viewers in more languages
2. DIY Captions
DIY captions help you to transcribe the YouTube videos, if not in most accurate manner, then in a little easier way. All you have to do is just paste the URL of the YouTube video and it will provide you all the subtitles. These may not be accurate but will provide you major base material which can be tweaked a bit here and there and is far better than making all the subtitles starting from scratch.
3 Subtitles for YouTube
Subtitles for YouTube is a Google Chrome extension which provides subtitles for YouTube videos. For this you will have to provide a subtitle file with .srt extension. The attractive feature of this is that you won’t have to download the video and still run the subtitles on it. This is very much helpful for people who work on YouTube or watch movies without subtitles.
Richard Bennett
Richard Bennett is a writer and a lover of all things video.
Follow @Richard Bennett
Also read:
- [New] In 2024, Elevate Your Channels - Templates at No Charge
- [New] Toolwiz Evaluation The Top Choice in Mobile Editing for 2024
- [Updated] In 2024, Esports News and Analysis From Top Vloggers
- [Updated] IPhone Time Travel Mastering Prolonged Photo Captures
- [Updated] Sourav Joshi's Financial Acumen in the World of YouTube Earnings
- A Complete Guide To OEM Unlocking on Huawei
- In 2024, Your Path to YouTube Studio The Editor's Command Center
- Mastering the Art of Audio with Zoom Your Complete Guidebook for 2024
- No-Cost Web-Based Aiff/Aac Audio Format Changeover - Movavi Converter
- The Professional's Guide to Adding YouTube Content to PowerPoint Slides for 2024
- Ways To Find Unlocking Codes For Vivo V27 Phones
- Title: [Updated] 2024 Approved Crafting Clicks Top Tags for Gamers' Content
- Author: George
- Created at : 2024-11-11 04:44:37
- Updated at : 2024-11-12 18:02:03
- Link: https://facebook-video-share.techidaily.com/updated-2024-approved-crafting-clicks-top-tags-for-gamers-content/
- License: This work is licensed under CC BY-NC-SA 4.0.